
Adding a client group and clients
Log in to the Active Platform at my.businessfitness.com.au.

Click Clients.

Note: If your firm has Active Sync turned on, clients and groups will be imported from your practice management software automatically, please skip to the next chapter.
Click + New Client, then Client Group and fill out the mandatory details. Click Add Client Group.


Note: The 'Code' to be entered is the APS Client Code.
Within the client list, find the client group you created and click on it.

Within the client group page, click + Add Client, fill out the mandatory details and click Add Client at the bottom right.


Creating a client ledger file and adding comparative year dataset
Within the client group page, search for the client you want to work with.
Click on the LR icon next to the client name and click Create File.


Add a new dataset for the prior year comparatives by clicking + New dataset.

Enter the name of the dataset for the year you are adding data for (eg. 2021 Actual) and set the dates as appropriate for the dataset (eg. for a 2021 dataset, the dates will be 1 July 2020 to 30 June 2021).

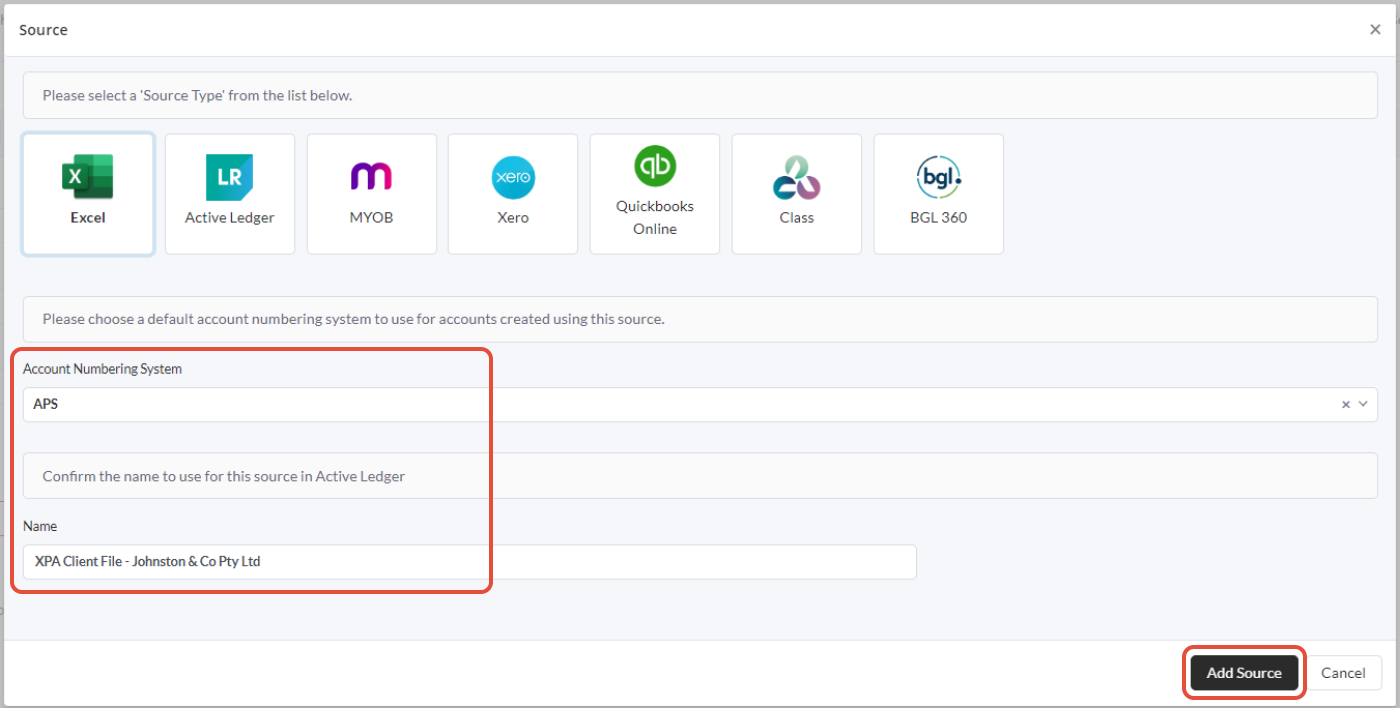
Click Source and Add New Source. Select Excel.


Select the APS number system and name the dataset, then click Add Source.
Click Create Dataset at the bottom left.

Exporting XPA comparative data to Excel
In XPA, open the relevant client and from the Toolbar, run the trial balance for the comparative year (eg. 30 June 2021).
Send to Datasheet by clicking the square grid on the Toolbar.

Export to Excel by clicking the green Excel button.

Save the Excel file to your local drive for easy access in next step.
Importing XPA comparative data to Active Ledger & Reporting
Open the Excel file downloaded from XPA. When you initially open the file you will see the data is highlighted. Click anywhere on the screen to unhighlight.
In the top right corner of your Excel home ribbon, find the Active Ledger add-in and click Import Data.

Login with your Business Fitness credentials.

Select the client you want to import data for and select the dataset you created earlier.

Click on the drop down next to Prepare Journal and select XPA. The journal dialog screen will open.

Ensure the journal type is set to Imported Trial Balance.

Classify account numbers as APS.

Note: Be sure to select the checkbox for 'Override existing classifications' to ensure the classifications are determined by APS.
Confirm that the journal is correct, and it balances. Click Import Journal.

The dataset will now be populated with the comparative year balances.
For more information relating to importing information from Excel, see the knowledge article: Datasets - Excel trial balance import.
Creating current year dataset and uploading data to Active Ledger & Reporting
Note: Ensure that your client data file has been reconciled to your signed financial statements as at the end of the financial year previous to the one you are currently completing. This will ensure that your clients opening balances for the current year you are working on agree to the closing balances per your dataset.
Click on the Datasets button on the left hand menu within the Active Ledger file for your client, add a new dataset for current year data by clicking + New dataset.

Enter the name of the dataset for the year you are adding data for (eg. 2022 Actual) and set the dates as appropriate for the dataset (eg. for a 2022 dataset, the dates will be 1 July 2021 to 30 June 2022).

Click Source and Add New Source.

Select the appropriate source for the client. For this example, we will select Xero as the source.

This will prompt a login to your cloud accounting provider online account. Sign into your account and follow the prompts to select the client file you wish to use as a source.

Once complete, the login screen will close and it will navigate back to the Active Platform where you are able to link the relevant Xero file. Click Connect.
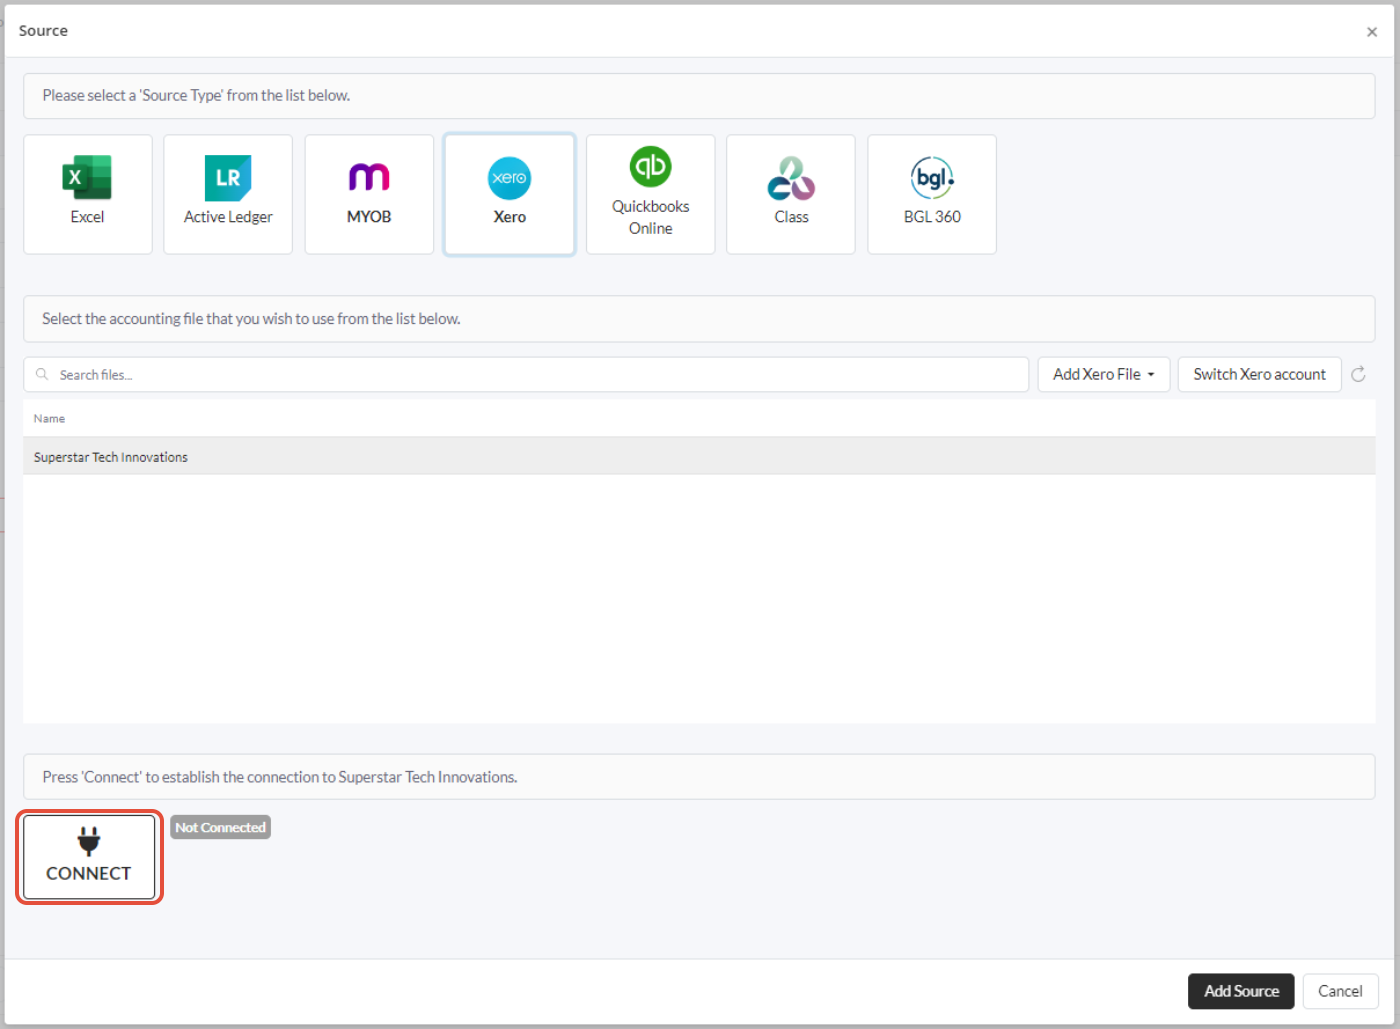
Once connected successfully, as indicated by the green 'Connected' box below, select Add Source.

Click Load Data and Save Dataset at the bottom left.

Note: Where importing data via Excel for clients not using a cloud accounting file, refer to the 'Importing client comparative data to Active Ledger & Reporting' section in the article.
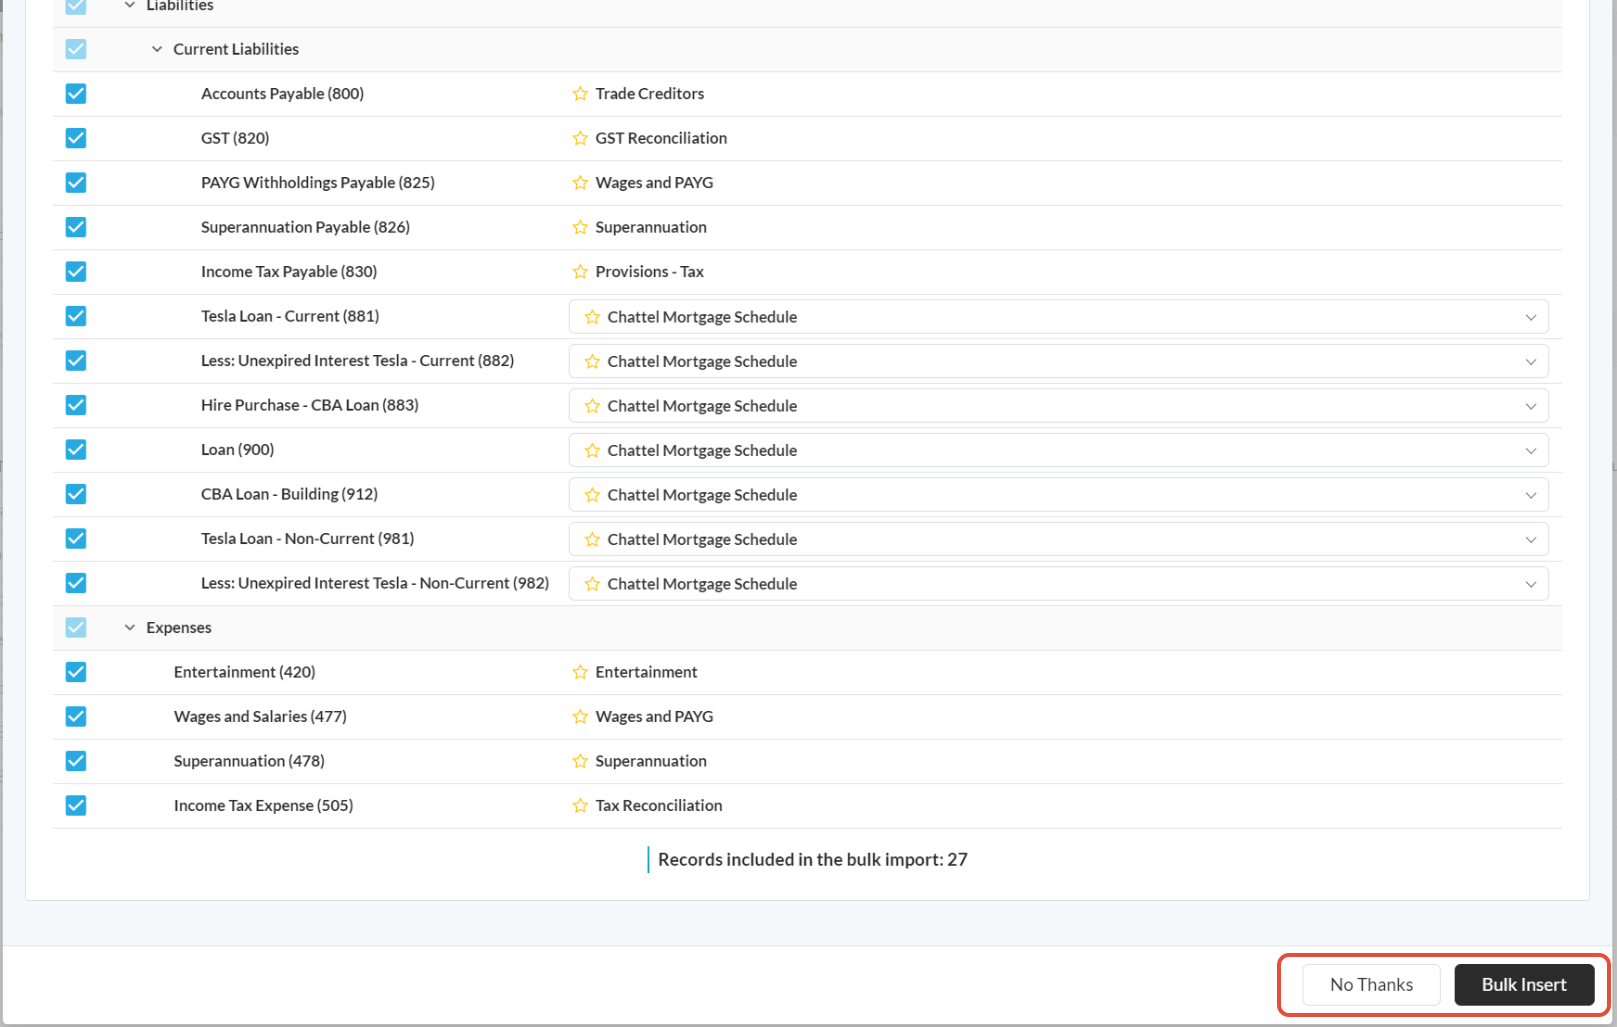
In the Accounts screen, click Auto Allocate.

For accounts that have not mapped automatically (which will stay in the right hand unallocated pane), drag and drop the account from unallocated to their correct positions in the chart of accounts using the three horizontal bars next to each account name.
For more information relating to mapping accounts, see the knowledge article: Accounts - overview.

Combining last years XPA accounts with this years client accounts
Drag and drop the XPA accounts on top of the corresponding client’s accounts (the accounts uploaded from the previous step). For example, if the client calls electricity expenses ‘445 - Light, Power, Heating’ in their accounting file, drag the ‘391 – Light and power’ XPA account on top of this account to combine the two. This will mean that for reporting purposes, the current and prior year light and power expense accounts will sit on the one line.

For accounts that have a recommendation (solid or hollow yellow star) next to them, check the recommendation is for an appropriate account and accept the recommendation. This will link the account to the standard reporting chart for consistency across the practice. For example, ‘461 Printing & Stationery' should be linked to ‘414 Printing & Stationery’, for naming convention consistency and ease of big data extraction.

For more information relating to account recommendations, see the knowledge article: Accounts - overview.
Importing assets to Active Ledger & Reporting
You can quickly import assets from XPA.
Extract your asset schedule from the last finalised year in XPA. For example, if you are completing 2022 year end compliance work, the last year completed in XPA will be the 2021 year. Download the asset schedule at 30 June 2021.
To do this, follow the steps below:
- Select the entity
- Retrieve the depreciation schedule that runs in the financial statements
- Select Xcede

- Select 'Sheets' and insert the 'DEPCNSCHBOOKTAX.XLS'

- Select 'Run'

- Include the following information and select the relevant set in the dropdown box (this will vary depend on how your firm has set up their reports).

Click Add Depreciation Year in the clients Active Ledger within the Assets section.

Make the depreciation year the year that you are working on, in our example, that is 30 June 2022.
If your client uses small business depreciation, select this checkbox.

If you wish to link the datasets to use to enable automatic depreciation, click on Add Datasets and select relevant datasets.


Click Add Depreciation Year.

Click Import from Excel.

Click import template to download the asset import template from Active Ledger. Save the file to a central location and open the file.

Note: If you are prompted to enable macros once Excel opens, close the file, right click on the file in downloads, click properties, unblock macros, then reopen the import template.
On the APS tab of the import template, copy and paste the full asset schedule and click Convert.

This will populate the asset import sheet with the asset data.

Note: Only accounting cost is imported, and where you have a different accounting cost compared to tax cost, the tax cost will have to be entered manually in the import template.
For any pool balances, add a pool balancing asset at the bottom of Sheet1 to include the following:
- In asset group column, put pool name
- In asset name column, put 30 June of year on the XPA assets schedule balancing asset (for example, '2021 Balancing Asset')
- In date column, put 30 June of year on the XPA assets schedule
- In the cost column, put 0
- In OWDV column, put closing balance of the pool at 30 June of year on the XPA assets schedule
- In rate column, put 15%
- In method column, put GP for General Pool, LVP for Low Value Pool and SDP for Software Development Pool
- In private use column, put private use %
- In the accounting columns, replicate the below image.

Close the asset import template once you have finalised the above step.
Select Choose File. Find the import template and click Open.

Select the depreciation year as the current year you are working on (e.g. 2022).

If your import file foes not include accounting depreciation values and you wish for the taxation values to be used for the accounting values, select this checkbox.
For pooled assets, complete the 'Auto Balance General Pool' section accordingly.

Once satisfied, click Prepare Import.

Note: Check the number of assets being imported matches the import template and click import assets.
All of your asset groups and individual assets are now within Active Ledger.
Note: For all motor vehicles, ensure you manually adjust the Asset Type to 'Motor Vehicles'. This will ensure the cost limit is applied to the asset.
To map accumulated depreciation and depreciation accounts for each asset group, select the cog wheel next to an asset group.

Set up automated depreciation by selecting the source you wish to add depreciation accounts within. Select the current year source, rather than the XPA comparative source.
Click Add.

For this asset group, select the correct accounts or create new accounts if required, as below.
Click Save Asset Group.

Repeat the above three steps for each asset group.
Once complete, your asset register has been imported and set up with automated depreciation, ready for you to start your current year work.
Creating a set of financial statements and checking comparatives
Reviewing how your financial statements look at this point can be completed either once you’ve completed your initial comparative balances or after you’ve linked your client data file. Here you can compare to what you have already produced in the comparative financial statements for consistency.
Within the Reports tab, select + New Report.
Click Special Purpose Financial Report.

The below screen will appear. Fill out the details accordingly.

Add report columns. Column 1 being your current year dataset.
To add a prior year column, click + Add Column and link to appropriate dataset.


Click the save icon and then Generate Report.

For more information in relation to creating a report, see the knowledge article: Reporting - creating a report.
Run through the report and identify any formatting changes required. Pay particular attention to your comparative balances, and ensure they are sitting within the same categories as last year. Check that your total current assets, total non-current assets, total current liabilities, total non-current liabilities, total equity, and profit agree to last year.

To make changes, head back to the report builder screen by clicking Close.

To customise different report pages, identify the page requiring changing and click Customise on the right.

Here you can collapse and hide account details, add note references etc.

Save your report regularly to avoid losing any changes made in the report builder screen.
Tip: Do not make any changes within the report output screen, as these won’t be saved.

You may find that you need to post a partnership or trust distribution for the prior year if your profit has not been allocated for partnerships and trust entities. If this is the case, head to the dataset for the prior year, click Other Info, and fill out your distribution (example below). Once complete, click post automated journal which will post the distribution.

For more information in relation to distributions, see the knowledge article: Datasets - other info - distributions.
If your firm is subscribed to Active Ledger & Reporting only, DO NOT proceed with the below.
Linking your Microsoft account
To connect your Microsoft account, log in to the Active Platform at my.businessfitness.com.

Note: It is essential that users connect their Microsoft accounts with Business Fitness so they are able to open documents within the Active Platform in Excel. Without connecting this, users are unable to do so.
Click on the Wp icon.

This will prompt you to link you Microsoft account.
Select Link Microsoft Account and follow the prompts.

Once connected successfully, you will be able to proceed with using the Active Platform normally.
Creating a Workpaper binder (for Active Workpapers users)
Within the client group page, find the client you want to create a binder for.
Click on the WP icon next to the client name.

Click Create from Scratch.

Select the type of binder you wish to create (e.g. for year end compliance work, select Accounts and Tax).
Ensure the dates match to your current reporting year, check that your assigned users are correct, then click Create Binder.

Click Open Now to open the Workpaper binder.

For information on how to set up the rest of the binder, see the knowledge article: How to create a binder.
Once you have completed the set up of your binder, you are ready to start preparing your workpapers.

Launching the Excel binder (for Active Workpapers users)
For information on how to launch the Excel binder, see the knowledge article: How to use the online and Excel binder.
Adding and reconciling records (for Active Workpapers users)
For information on how to add and reconcile records, see the knowledge article: How to link various records to a binder.
Further, for information on how to add your own worksheet to a binder, see the knowledge article: How to add your own worksheet to a binder.
Workpaper binder tips (for Active Workpapers users)
There are a few main tips relating to the Workpaper binder, as below:
- On your initial set up of the binder, before you open the Excel sheet for the first time, if you prefer to see the year you are completing on the right hand side of the trial balance please select column 1 as your comparative and column 2 as your current year
- You can move the worksheets around like you would any other Excel spreadsheet - this will not change the link it has to the trial balance.
Additional resources
If you need help, please refer to the following for guidance:
| Resource | Summary & link |
| Quick start video - Active Ledger & Reporting | Click here to discover how to configure an Active Ledger file for a client, including setting up datasets, mapping accounts and preparing financial reports |
| Quick start video - Active Platform | Click here to discover how to set up clients/client groups and navigate the Active Platform home screen with ease |
| Quick start video - Active Workpapers | Click here to learn how to create a Workpaper binder for a client, link a data source, add standard/custom worksheets, and perform account reconciliations |
| Video - How to upload comparative datasets from XPA into Active Ledger & Reporting | Click here to learn the ins and outs of importing your client's comparative year financial data using a seamless process from XPA to Active Ledger & Reporting |
| Training Centre | Click here for user training courses for Business Fitness products |
| Support Centre - AU | Click here for our library of support and user guide articles |